How to Build the Weilandfilm Theatrical Poster Lightbox
Trim
Things Are Getting a Little Mouldy
Now that the rails are properly outfitted with screen moulding and accent blocks, the only trim left to apply is the embossed, quarter-round moulding around the perimeter of the lightbox near the back where it will rest against the wall.
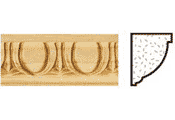
You will find that there are many types of trim that you can use, so choose whatever style you wish. But select a moulding that is at least 1-inch in height to adequately cover the area where the back braces are notched through the side panels (in four locations) as well as the thickness of the masonite back panel. I’ve found embossed moulding (poplar) at both Home Depot and Lowe’s warehouses, but you can find more lavish designs at specialty stores if you wish. See the example in Figure 7.1. Measure, cut and miter together the four lengths of quarter-round so that they fit snugly along the outer perimeter of the box.
Before attaching them with nails, apply the desired antiquing to these pieces of trim as well as to the rails that were constructed earlier. When dry, attach the moulding with trim nails, being careful not to split the wood upon nailing. It might help if you spit on the end of each nail before driving it into the trim. I’m not sure how it works, but it seems to ease the nail in without causing the wood to split. Actually, when I’ve done this, I can’t remember ever having a piece of trim split on me. You might find that it helps you as well.
After attaching the trim, you may need to create a small notch in the trim at the bottom of the unit for the power cord to be channeled so that it won’t be crimped or smashed when the lightbox is hanging. If that is the case, simply notch out the desired amount of wood and arrange the cord appropriately, stapling it into place.
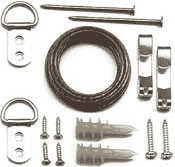
Lastly, attach a mirror kit or large picture mounting kit to the back of the lightbox. Most large picture-hanging kits are able to handle quite a bit of weight, and after the trouble I went through making a lightbox, I wasn’t about to employ a chinchy, lightweight hanging system. I bought a mirror kit that was rated at 35 lbs. It consisted of braided picture wire, 2 D-rings, two picture hanger/hooks and the necessary screws and wall anchors. The kit comes complete with mounting instructions. See Figure 7.4.
The Final Act: Displaying the Poster
With the trim installed and the hanging kit attached, the lightbox is relatively complete. All that remains is to insert the poster of your choice. Like most one-sheets in theaters today, ours will be held in place with transparent tape. You’re probably surprised. Well, to be honest, there was just no easy way to clamp the poster along the top of the print ala a pseudo, monster-sized, chip bag clip. So we had to fall back on our old friend, transparent tape. But don’t despair. You’ll only be applying a few pieces (three to four that are 2-inches in length) of Scotch tape horizontally along the top of the poster. Gravity should do the rest, and the poster will simply hang in the air pocket between the two pieces of Plexiglas.
By the way, don’t worry about seeing tape on your poster when it is displayed in the lightbox. You will only be overlapping (at most) a ¼” of tape onto the poster, and the front rail assembly will sufficiently matte the outer rim of the poster so that the tape won’t be seen.
As a side note, it should be known that the original design called for the poster to be sandwiched firmly between and suspended solely by the two Plexiglas panels. In fact, the prototype was constructed this way, and I was forced to administer the biggest change to my design as a result. At first, the poster hung great. But after a few days, the print started to sag and ripple since it wasn’t able to freely expand and contract. Given their size and flimsy nature, the plexi panels flexed and could not maintain a firm hold across the entire surface of the poster. So as the humidity and temperature (from the lamps) changed, the poster would exhibit ripples in those areas that weren’t tightly sandwiched. So I was forced to create an air pocket between the plexi panels of my prototype only a month after I thought I had finished my project.
Since employing the air pocket solution over a year ago, I’ve not had one wrinkle or ripple in my Gladiator theatrical poster. It has floated freely, allowing for expansion and contraction caused by both humidity and temperature changes. In addition, I’ve not had to re-tape the poster either.
So, it’s now official. The last thing to do, unless you’re still waiting for paint to dry, is probably the hardest part: deciding which poster you’ll display in your lightbox. But before you decide to extensively ponder that, check out my closing thoughts.
Reference Diagrams

Figure 7.1: Embossed poplar moulding (pattern and cross-section.)

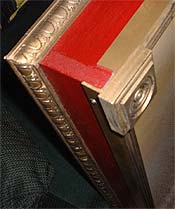
Figure 7.2: Mitered poplar quarter-round and accent block.

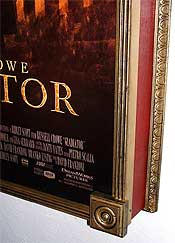
Figure 7.3: Accent block, screen mould and embossed poplar quarter-round.

Figure 7.4 Mirror hanging kit.