How to Build the Weilandfilm Theatrical Poster Lightbox
Plexiglas and Front Framing Angles
The Plexiglas
Now that lightbox’s interior is complete, it’s time to move on to cutting the Plexiglas and outfitting the aluminum angles that will become the front framing rails which hold the plexi in place.
First, a UV-protection scheme needs to be decided upon. Ultraviolet rays need to be filtered out before the light reaches the poster, or your two-sided print will slowly fade as a result of being bombarded by UV radiation. On occasion, I’ve been able to find Plexi that filters UV rays on its own. You have to do some research and hunting, but it is available. If you can’t find a UV-filtering plexi product, several UV-blocking tinting treatments will do the trick. Simply apply the window tinting to the lamp-side face of the inner plexi panel. I have noticed that it is hard to find white window tinting. Just remember that it is important to protect your prints from fading. How you do it is up to you.
That said, cut the inner piece of Plexiglas that will fit into the recess that we routed with a rabbeting bit in Section 4. Lay the plexi on top of the lightbox’s face and use the boundaries of the recess as a guide for marking the cuts you will make. Remember that the inner panel will fit loosely into the 5/16″ recess, so make your cuts appropriately. I will not specify any hard dimensions for the inner panel since its size will depend on how square the unit is and how it is routed. As for cutting the panel, save yourself some grief and purchase a $2.00 Plexiglas cutting tool. Simply score each of your cuts several times using a good straight edge and snap the pieces apart.
Next, attach a gasket or foam-like material around the entire perimeter of the outer face (surface that will be closest to the poster) of the inner panel. This will act as a spacer between the inner and outer Plexiglas panels and allow your poster to hang freely in an air pocket without being pinched. (See Closing Thoughts for more information.) Remember to keep the spacer material pushed to the perimeter’s edge since you will want as much leeway left-to-right and top-to-bottom as you can get in case your poster or lightbox is slightly out of square.
Frost King makes a poly-foam weather seal with self-sticking backing tape that works pretty good. However the only product that comes close to working is 1/8″ too wide for this application. I ended up using their 3/8″ wide, 1/4″ thick product and cut it down with scissors from 3/8″ to 1/4″ in width so that my posters wouldn’t be too crowded. Again, remember to keep the weather seal as close to the outer perimeter of the inner plexi as possible.
Next, cut the outer piece of Plexiglas so that it is the same size as the lightbox’s overall perimeter (roughly 28-1/4″ x 41-1/4″.) Again, I suggest laying the sheet of plexi over top of the lightbox frame and marking your cuts accordingly. The lightbox may not be precisely square, and if you simply measure and cut the plexi at the above dimensions, you may have a hard time lining everything up.
Finally, you may want to diffuse the light further and eliminate any lighting hot spots as a result of the lamps being right under the print. If you’ve not chosen the white, UV-filtering, tint option, you can either lightly apply white spray paint to the the backside of the inner plexi or attach a piece of translucent, white poster paper. This will diffuse the lamp’s light and hopefully eliminate any hot spots.
Aluminum Frames It All
Once the Plexiglas pieces are completed, we need the put together the outer framework that will hold the panels in place and frame the front of the lightbox. We’ll accomplish this by framing the outside of the lightbox with four, 1″ x 1″ (inside dimensions) aluminum angles. The aluminum stock that I used had a thickness of 1/8″ and had an outside dimension of 1-1/8″ x 1-1/8″.
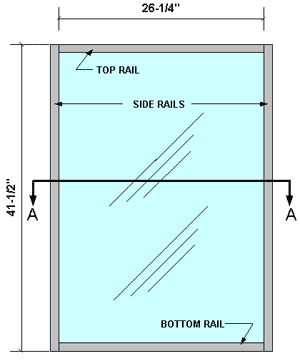
Measure and cut four pieces of aluminum angle with a hack saw at the following lengths (See Figure 6.1):
- (2) side framing rail pieces at 41-1/2″
- (2) top/bottom rail pieces at 26-1/4″
 Since this design utilizes accent blocks on all four corners of the lightbox face, don’t worry too much about the quality of your cuts.
The 2-1/2″ accent blocks will hide the seams where the angles meet up, so simply straight-cut them neatly (do not miter at 45-degrees.) See Figure 6.5.
Once cut, make sure that both Plexiglas panels are properly in place and lay the four piece out according to Figure 6.2 at right and Figures 6.3 and 6.4 below.
Again, please be sure that the outer Plexiglas is laying atop the lightbox frame while working with and attaching the aluminum angles throughout the rest of this section. The top plexi’s thickness will need to be accounted for when drilling the pilot holes when attaching the rails to the hull.

Figure 6.3: Framing Rail Section A-A (See Figure 6.2 above)

Figure 6.4 Framing Rails Atop the Face of the Lightbox
On each of the 41-1/2″ side rails, lay out three holes — on each of the 26-1/2″ top/bottom rails, lay out two holes per Figure 6.6.
Drill the ten holes in the angles with a 9/64″ bit and follow up with a 1/4″ bit just deep enough to create a depression so that the #6 wood screws can be countersunk into the aluminum.

Figure 6.6 Hole Layouts for Aluminum Framing Rails
Once the angles have been drilled, position the rails on the lightbox once again. Again, it is very important that the outer Plexiglas panel be in place. When the plexi panels, framework rails and lightbox are all lined up satisfactorily, proceed to drill 10 pilot holes (1/4″ deep) into the sides of the lightbox with a 1/16″ bit. Use the holes in the aluminum angles as guides. Once all the pilot holes have been drilled, use #6 wood screws to attach the four aluminum rails to the hull. If you find that any screwheads are not flush, use the 1/4″ bit again to rout a deeper countersink.
Cornering the Elusive Accent Blocks
With the rails attached to the hull, position four, 2-1/2″ square, wooden, accent blocks on the corners of the lightbox face as shown in Figures 6.7 and 6.8 allowing all of the blocks to over hang the aluminum rails by a 1/2-inch.
Tape the four blocks to the two long, side rails with masking tape. Once all four blocks are in place, unscrew all four rails being careful not to dislodge the accent blocks from the framing rails. Since each block will be attached to the rail with two screws, flip the rails over and drill two holes through the aluminum at each block location with the 9/64″ bit. (See Figure 6.9) Be careful not to drill into the accent block. With the accent block still taped in place, drill two pilot holes approximately 1/4″ deep into the accent block with a 1/16″ bit. Create countersinks for each hole in the aluminum with a 1/4″ drill bit like before and screw the accent blocks to the rails using #6 wood screws. It is important that the screw heads be flush or else the framing rails will not seat properly against the Plexiglas when everything is reassembled.
When all four blocks have been attached, place the rails on top of the lightbox again. At this point, if you wish not to deal with four separate rail pieces going forward, you can similarly screw the lightbox’s top rail into the left rail’s top accent block and screw the bottom rail into the right rail’s bottom accent block. This ties the rails together and makes changing the poster less aggravating with two rail components versus having to deal with four separate rail pieces.
After you’ve incorporated the top and bottom rails into the accent blocks or if you’ve decided to stick with the four separate rails, we need to attach the three-ribbed, pine, screen moulding on the the face of each rail between each each of the accent blocks. Unfortunately, glue was the only fastening solution I could come up with to attach the trim to the framing rails. There existed no fasteners that could be easily incorporated with the screen mould and aluminum, so wood glue was chosen as a last resort. Since we’ll need a good bonding surface for the glue (and for the spray paint later on) scuff the aluminum angles with steel wool and thoroughly clean them afterwards.
Now screw the entire rail framework to the lightbox again. Measure and cut the required four lengths of screen mold that will sit atop each rail and run between each accent block. Glue the trim to the aluminum rails with wood glue, lining the trim up along the outside corner of the aluminum angle. (See Figure 6.10) You may need to employ the use of clamps to make sure the trim is glued tightly to the aluminum.
Once the glue has dried, proceed to paint the rails. I’ve used two different kinds of antiquing kits in the past. Both are of the American Accents brand (made by Rust-Oleum) and are rather impressive. They are Antique Gold (#7981-955) and Antique Pewter (#7983-955.) However, I would suggest cutting and fitting the remaining lightbox trim first (described in the next section) so that you can paint and antique all of the lightbox trim and framing rails at the same time.
Next, we tackle the embossed trim that adorns the outside of the lightbox.
Reference Diagrams

Figure 6.1: Cut four pieces of aluminum angle for the front framework of the lightbox.

Figure 6.5: Aluminum angles meet up at the corners of the lightbox but will be hidden by the corner accent blocks.

Figure 6.7: Basic layout for the four corner accent blocks that hide each aluminum rail seam.

Figure 6.8: Accent Block Placement: Allow each 2-1/2″ square accent block to overhang the aluminum rails by 1/2-inch. If you decide to use larger blocks, you may want to adjust the overhang proportionally.

Figure 6.9: Aluminum Angle and Accent Block: After taping each accent block in position, attach them to each end of both side rails with #6 wood screws. At each location, drill two holes — in a pattern similar to that shown above — through the aluminum with a 9/64″ bit. Then drill pilot holes and create countersinks for each hole. After all four blocks are attached, you may connect the top and bottom rails to the blocks as well.

Figure 6.10: Pine Screen Mould On Aluminum Angles: After each of the accent blocks are attached, install the three-ribbed screen mould between each of the four corner blocks. Line the moulding up with the outside corner of the aluminum angle and glue it in place.