How to Build the Weilandfilm Theatrical Poster Lightbox
Basic Design
I Have A Dream…
The backlit poster box is meant for only one purpose — displaying two-sided posters. If you’re not planning on buying two-sided posters, you really shouldn’t be putting yourself through this ordeal. You’d be better off buying a 27 x 40 theatrical poster frame from Suncoast Video and down lighting it.
With that out the way, the basic design of the lightbox is fairly elementary: construct a wooden frame (the hull) deep enough to house three strips of fluorescent lights needed to illuminate the poster from behind. Now float your favorite print between two sheets of Plexiglas. See, it’s not that complicated.
Well it honestly wasn’t quite that simple either. Looking back, I can say that constructing the lightbox was fun and rather simple, but the design surely took some planning. And even throughout construction, it was redesigned a few times. Believe it or not, I was still revising a few things a month after I had officially “completed” the project.
Where does the Prototype fit in?
Bear with me a few minutes more while I cover a topic that will put this whole workshop into perspective. I’ve built two lightbox units. One now hangs triumphantly on my living room wall. The other was built for a friend of mine. As this first unit is truly the prototype, I will continue to refer to it as such. But you will find that this how-to guide will not chronicle my prototype, rather it depicts a slightly modified plan that I employed on the second one … and the plan I intend to follow on the next one… and the next one…
So throughout the remainder of this article, when I refer to the lightbox, I am referring to the most recent and final (to this point) design implementing several modifications to the prototype.
Basic Design
 This is a quick look at the basic design of the lightbox unit. Dimensions and schematics will be provided in a later section.
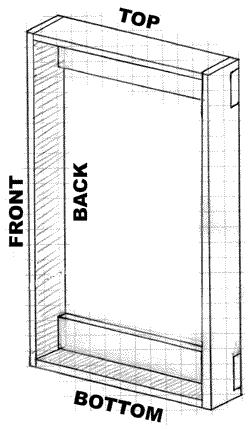
In its simplest form, the lightbox is a frame (see figure to the right) constructed of 6 pieces of 1×4 poplar wood. As can be seen, I chose to run the side pieces of the frame long, covering the ends of both the top and bottom pieces. I chose not to miter these corners, but if you’re good at mitering corners, by all means — miter away! But as you can see, you most likely won’t see the top or bottom of the lightbox, so who cares if the cut ends show in those locations?
Across the back of the frame (at the top and bottom) are two reinforcing back braces that add rigidity to the frame while also serving as mounting areas for the ballast, wiring and fluorescent tube lampholders. Notice how these pieces are notched into the side members. Since the lightbox will be supported primarily from the top reinforcing piece, I notched it into each of the side members for added strength. I did the same for the bottom reinforcing piece for the sake of uniformity. Yes, you can see the ends of these pieces, but the ornate wooden trim (quarter-round) that will run around the lightbox’s perimeter will cover these raw edges.
The depth of the frame is crucial to ensuring that the fluorescent lighting can be housed inside the unit without coming in contact with the backside of the poster. With the 1×4 poplar (which measures 3/4″ by 3 1/2″ actually) I was able to achieve this clearance for the bulbs that I chose to use. Please keep this in mind if you decide to use a different type of bulb.
Beyond the frame layout, we’ll be slapping some lighting inside, mounting a ballast, installing a switch, running some wire, fastening two layers of Plexiglas to the front, painting and trimming out the unit.
Now that we’ve had a look at the basic design of the lightbox, we’re ready to review the materials used to construct this beast.
Lightbox Specifications
- Cost: around $200.00 USD
- Weight: approx. 25 pounds
- Dimensions: 41-1/4″ x 28-1/4″x 5″
Conceptual Sketches
Here are a few (of the many!) conceptual drawings that were thrown together throughout the long, drawn out process I called “The Design Stage.” Trust me — it was too long. Please note that some of these ideas were scrapped.


